December 18, 2017

Cookies n Milk Mini Shaker Card

I may be addicted to making shaker cards! Made this one a while back when I was a Dirty Girl for the first 6 months this year at SplitcoastStampers.

SCS 02 cookies and milk mini shaker card wm

The papers are by Doodlebug Design from the February 17 Simon Card Kit. If you don’t subscribe you really should! The long thin panel is cut from a paper which is all banners. The little image is from what I call a ‘cut apart sheet’. You know, those ones with all small tags or images meant to be cut apart and used separately. I’m always so happy when I see a paper pack with those types of papers! I super carefully cut the center out of the milk bottle and adhered it to a scrap of cardstock. On that scrap I built my shaker walls with foam tape. Then I added some glass glitter. It doesn’t stick to the acetate like plastic based glitter. I made sure to not add so much glitter that the little face was obscured. I love that the glass glitter appears white like milk!

Enjoy, Rebecca

December 10, 2017

Winter Coffee Lovers Bloghop!

Today I have a card that does double duty! It’s my Coffee Lovers bloghop card AND it’s my Crazy 4 Challenges card. The last challenge of the year as we break for the holidays.

winter 2017 coffee lovers-hop-square-with-dates

Our Crazy 4 Challenges theme was to use a previous 2017 sketch. I was super happy because sketches are my favourite! I chose the one from May which worked perfectly with the coffee cup I decided to use.

c4c coffee last sketch

The paper is by Bo Bunny from a year or two ago. I pulled out an older Simon Says Stamp kit (do you guys use your kits up right away? I never do) but decided to go with a new coffee set rather than the one that came with the kit. The stamps are by Neat & Tangled, the Perfect Blend stamps and dies, which are on sale right now. If you like them get them soon as they are retiring.

The background was already stunning but I decided to add some stenciled Nuvo glitter paste swirls. The green/aqua iridescence is very prominent in this paste. It wasn’t looking quite as amazing at the top as it did at the bottom. So, Copic to the rescue!  I added some purple marker over the glitter paste, using the side of the brush tip, which made the glitter match the paper much better. The stencil is by Echo Park and the die cut under the coffee cup is the Quinn Flourish by Memory box. I’m noticing this really needs some more sparkle (can you ever have too much??) so I will add some sequins and maybe some shimmer spray.

Enjoy, Rebecca

December 02, 2017

Genius is Crazy!!

Our challenge this week at Crazy 4 Challenges is to colour! Never a problem-o for me! I have Copics, coloured pencils, watercolours, pearlescent watercolours, Inktense pencils… you get the idea!

c4c colouring crazy fish

When I first saw this sentiment, I HAD to have it! Most of the time I feel like I am losing my mind and am somewhat crazy! So this was so perfect. Ah, but what image to pair with a sentiment like this? I really had to think about that. My first  though was Tim Holtz Crazy Birds, but they are so odd, I didn’t buy them! Then I remembered this very, VERY old SU! stamp set with lots of kookie fish. Perfect! I coloured one up on X-Press It paper and voila! The image is a match made in heaven!

Then I had to find some paper to match and amazingly some again, the memory of some very, VERY old paper crept up in the back of my mind AND I actually found it! Yeah! This card is about simple as it gets, a hand-cut image, the only die was the stitched rectangle by SSS I used on the green panel, and I used some white and black Ranger enamel dots to make the kookie eyes! Googly eyes would have been more fun but I only have huge ones.

Have a good one!

Enjoy, Rebecca

November 20, 2017

Tropical Art Journal Spread

Yeah, I know it’s winter. But I have some projects left to show you from my time on the Dirty Dozen design team for SplitCoastStampers. And you know, I hate winter and all that!

SCS 01 vacation pages wm

The theme for the month was Guilty Pleasures. If I could pick something to really enjoy it would be a vacation somewhere warm and sunny! So I made a page to show a beach I’d like to visit. The base is an island map I printed off the internet. I covered it in matte medium to keep the ink from running when I added layers of acrylic paint. The tree trunk was hand drawn then cut from cork and coloured with Big Brush pens by Faber Castellar. The leaves were also hand drawn but on cardstock then coloured the same way. If you try this, be sure to seal your surface with more matte medium or the Brush pens won’t shade and blend.

Creating the island in the background was a bit hard. I wanted to make it look like the Hawaiian islands covered in lush green foliage but I also didn’t want it to become a flat green blob. I intended to make more trees but the ones I did took so long I gave up eventually! oh well, for me my art journal pages are for learning and exploration so I didn’t care too much. The map under the paint didn’t show up as much as I had hoped so to add more texture I stamped some tone-on-tone stamping. I used lots of postal cancellation marks and botanical illustration text. Last but not least I added some journaling, the crab and sand dollar and lettering.

Enjoy, Rebecca

November 17, 2017

Autumn Greetings Shaker Card

Well, it’s pretty cold here so I have to admit that it’s fall. Summer is my favourite season so I hold on to it as long as I can. I don’t like fall even though it’s pretty because it means cold, cold and more cold. Ugh! And I’m not a huge fan of fall colours either but sometimes everything just falls into place and I make a fun fall-themed and -coloured card.

c4c fall leaf shaker

I started this card by using the sketch this week for Crazy 4 Challenges. I do hope you will pop on over and check it out. Instead of adding a layer for the three dots on the focal panel, I turned two into cut outs and placed my sentiment in the third spot. The background paper is dark chocolate cardstock by Simon which I embossed with a texture plate by PTI. I love the subtle and woodsy texture I get from this plate. I filled the shaker with a mixture of sequins by Lucy’s Cards, Studio Katia and micro beads by Martha Stewart.

The cutouts were made with dies by Spellbinders and I used some of the tiny ones to create a little border on the left side. The orange panel was wider but after applying the leaves, it looked lopsided. So I trimmed off a bit with an x-acto knife. Sadly when I removed the foam adhesive, it slightly tore the dark chocolate cardstock. So lace to the rescue AKA an embellishment opportunity! Now it looks balanced AND the lace adds some rustic charm to the card.

I hope to see you over at the C4C blog!

Enjoy, Rebecca

November 11, 2017

Poppies Card with Embossed Die Cuts

Today is Remembrance Day in many countries so our hostess asked us to use poppies or make a card of gratitude or respect. I chose to make a generic card with poppies on it.

c4c poppies

Sorry the photo isn’t too great; I had to use my phone. But in a way it allowed the lighting, not in my light box which overexposes clean whites, to show the detail.

I tried a couple of new embossing techniques on this card. The background was spritzed with water before pouring the rose gold powder over it. This gave me splatters of rose gold like you would get from a mist or paint. Next I die cut the flower and removed the die cut to give me just the negative space. I saved this die cut and cut two more. For the blue peeking through the negative space, I used some Navy Steel powder by Simon which I poured on a scrap of cardstock inked with Versamark. Then repeat 3 times until I got smooth even coverage. Then I adhered it to the back of the negative space.

The last technique is to cover a die cut in rose gold powder. It’s the same basic technique as covering the scrap with Navy powder but it’s trickier because it’s small and delicate plus you don’t want any naked spots! There are several methods you can use. Some people use temporary adhesive to attach the die cut to a tab of paper so they can hold it while inking and heating it. I prefer to use tweezers on all but the last layer and I move it to a different spot each time. For the last layer, I place my die cut on a heat proof surface and use the tweezers to hold them, not by clamping them on my paper but by placing them in the space between the stems so they can’t blow away. If the die cut had been sturdier, I would have used the tab method.

In case you are wondering, yes, I could have embossed a large scrap then die cut it. But then the edges aren’t smooth and sometimes the powder can chip especially when you use so many layers.

Enjoy! Rebecca

November 04, 2017

Lovely Layers Cake Card

Do you prefer lots of layers or Clean and Simple cards? Perhaps somewhere in between? I’ve been making more CAS cards lately but my true love is shabby and layered. I’m guessing that even if you don’t like to make that type of card, you must enjoy seeing them or you wouldn’t be here! So I was in love with the challenge this week at Crazy 4 Challenges.

c4c shabby cake layers

Sometimes I start with a stamp, other times a paper or embellishment. With this card, I started with the image as I had already coloured it, with Copics, but decided not to use it that day. Next I wanted something pretty behind my image so I looked through my ornate dies, most by Spellbinders but a few by other companies. I basically audition the dies by placing them behind the image. I wanted some of it to show but not so much that it overwhelmed the image or required a larger than standard card but not so small it wasn’t worth having it there.

After choosing the die, I decided on my papers. The background is a kraft woodgrain paper from a Simon kit. I tried a couple of options for the gold paper; the gold I recently bought from PTI is very yellow and therefore too bright for this card. But my mirrored cardstock, which is my go-to gold paper, was perfect! The only white flowers I have right now have mustardy-yellow centers. So being someone who always tried to make it work, I covered the stamens with a Kirarina Wink marker. It covered so well I was pretty amazed! After the ink dried, I airbrushed some blush Copic marker in the center.

Also in the theme of making it work, I wanted to use a couple of corsage pins but the ‘white’ of the pearl looked more very grey next to the warm tones of my card. And the pin was silver while all the metal on my card was gold. So I airbrushed the pearl with the same Copic as the flowers and coated the pin with gold Sharpie.

Enjoy, Rebecca

October 28, 2017

Awareness Inspiration

Because October is Breast Cancer Awareness week, Bonnie asked us to use pink while making an inspirational card this week. This may seem like an unusual sentiment along with the cancer awareness ribbon but I thought of it as the perfect card to celebrate a treatment victory, big or small.

c4c awareness ribbon

I’ve been making a lot of clean and simple or graphic cards lately so I was feeling the pull of freestyle collage and my simple shabby signature style. When I am trying to design in this style, I usually reach for Maggie Holmes and My Mind’s Eye. Today Maggie won! All the papers and most embellishments are from her line. The tag was cut at the top with Tag Classic 2 from Neat n Tangled and at the bottom with a die from Select-a-Size edge dies from Concord & 9th. Then I added a whole bunch of bits and bobs. The awareness ribbon die is by Lifestyle Crafts. I think they are now part of WRMK so you may not be able to find that exact die.

For this shabby/freestyle design, I first decide what elements I have to have. I started with the tag, the background and the awareness ribbon. Next I needed to fill some space in the background so I added the washi and glitter tape. Next I selected the chipboard element that looks like a banner with the heart and white sentiment. To bulk up the tag, I added some filler on both sides; on one side some corrugated cardboard with Finnabar patina paste, on the other a tag I decorated with lace, rickrack and twine. Last I added the flower die cut, vellum leaf, twine on the big tag, the tiny bit of mint lace and finally the sequins and gems.

This is the perfect theme for October. Come on over and play with us at Crazy 4 Challenges.

Enjoy, Rebecca

October 26, 2017

Puppies and Kittens in Windows, Oh My!

I’ve always loved Laura Bassen’s rainbow ink blending. It looks so smooth and makes her cards so fun. So I channeled my inner Laura while making this card for the Crazy 4 Challenges sketch this week.

c4c puppies n kittens party

I started by tracing my dies on my white card base then using Distress inks to add the ink blending. Then I tried to cut the openings in my light grey panel with to match. Oops! Turns out this is the backwards way to do it. I should have cut the openings first then traced them on my white card base to get the perfect placement of the ink blending.

c4c puppies n kittens party2

Then I stamped the cute little critters, coloured them with Copics and die cut them. This looks like a shaker card but it’s really a faux shaker. I glued all the sequins in, it seems like it would take a while but it’s pretty quick actually. Then I added a acetate sheet between the windows and the ink blended card base. This uses far fewer sequins than a traditional shaker so it’s perfect if you only have a few of the sequins left that you want to use.

c4c puppies n kittens party3

Then I added a few ink blended balloons and the sentiment. One balloon was even tucked under the acetate in the window with the poodle. I was going to add some Nuvo drops but I decided it was busy enough.

Don’t forget to drop by the C4C blog to enjoy out sketch this week!

Enjoy, Rebecca

October 13, 2017

Winnie and Walter WCMD Cards

I’ve got two cards for the W&W WCMD challenge entries and another that qualifies for Crazy 4 Challenges as well! So it’s a triple bill today!

c4c youre so cool ice cream

First up, this card works for the W&W CAS challenge, the background challenge, the rainbow challenge AND for C4C! This week our challenge was to be inspired by dessert! I am always up for some dessert! I feel terrible that I don’t have any W&W products for my cards but I hope to get some really soon! Thanks for opening your challenges to any products!

For this card I used Ice Cream Dream by Simon Says Stamp which I stamped with Versamark and heat embossed with white on Bristol smooth cardstock. Then I used my Gansai Tambi watercolours to add deliciousness to these images! For the popsicle sticks and the ice cream cones I added some gold watercolour to the shade I mixed giving them some shine. When I was finished I also added some shimmer spritz over the entire panel.

silver butterfly

Next up is a silver butterfly card for the W&W stenciling challenge. I used a Simon Says Stamp stencil for the background adding Distress inks in Tumbled Glass and Peacock Feathers. The die I cut in vellum is also by SSS and alongside it I arranged lots of sequins and Nuvo drops in Duck Egg blue. The butterfly die (Memory Box) was cut from a scrap of white cardstock to which I then added some glue that never fully dries but rather remains tacky. Then I added some silver gilding flakes. It’s a bit hard to remove the excess from such a delicate die cut so I placed it back in the die. As the die cut settles down into the grooves of the die, the excess sticks up and it has an edge against which you can brush off the extra!

artful flowers ToY

Last but not least is my entry for the background challenge. This simple embossed resist with watercolour turned out better than I could have expected. And the Steel Navy embossing powder by SSS is exquisite! My new fave for sure! The die is by Papertrey which I cut with some navy cardstock. Then I added 3 layers of powder to get a really nice rounded effect that looks a lot like an epoxy word sticker! a few sequins finished it off nicely.

I hope you will play along with our challenge this week at Crazy 4 Challenges. I know it’s a busy time for anyone making holiday gifts but hopefully you can find an hour or two to spare!

Enjoy, Rebecca

October 08, 2017

Happy WCMD Weekend! Sparkle, Shine and Shake!

Hi everyone! I hope you enjoyed celebrating World Card Making Day yesterday! I had so much fun making my card I ran out of time to blog it!

blue sparkle shaker

Simon Says Stamp has a WCMD challenge to make a holiday card. I don’t celebrate any holidays so I made a winter card that could be used for a holiday, just not by me!

blue sparkle shaker2

I used background paper by Kaisercraft with a subtle snowflake and flourish print. It’s so subtle the camera really doesn’t pick it up well especially with so much going on but it is very pretty. The frame was cut from grey cardstock with double stitched rectangle dies by Simon Says Stamp. I did some partial die cutting so the frame is a bit shorter than usual so I had room for my ribbon at the bottom. I used a silver Wink of Stella glitter pen to add some shimmer to the frame. Though I worried that the frame ended up too dark, when the card was completed, it gave the card some contrast it needed since it is so monochromatic.

blue sparkle shaker3

I used Heat Resistant Acetate by Hot Off the Press to make my window. Even though I melted embossing powder repeatedly, there was only minimal warping so I was very pleased. For the main sentiment (SSS), I used white embossing powder first then after that was cooled, I stamped again this time using Hero Arts white pearl embossing powder. It worked out wonderfully! The height of the previous layer gave the pearl powder more dimension so it looked more pearl-like and the opacity helped it to look more white. You can see how the white pearl powder looks on the acetate by itself as I used it to stamp some snowflakes. It shows up best in the corner right above the bow in the previous photo. It has a bit of a silver pearly sheen while being still quite translucent.

blue sparkle shaker4

For the goodies inside, I added lots of white, blue, clear and silver sequins along with some snowflake, heart and star confetti. Oh, and a few white iridescent and clear gems. I think that’s it! :) I didn’t use a specific pack but rather bits and bobs from a lot of bags of Lucy’s Cards. Then there is my bow using May Arts white crinkle ribbon, Stampin’ Up! silver ribbon from an eon ago and a final touch of Morning Dew Nuvo drops on the card and acetate.

Enjoy! Rebecca

October 07, 2017

Happy World Card Making Day! 2 Mini Product Reviews

Crazy 4 Challenges is happy to have a challenge right on WCMD! Awesome right? For such a happy celebration, our host this month, Bonnie Sharp gave us the best challenge of all! Just make a card! Since that’s what we all usually do, though tags, ATCs, packaging, mixed media pieces and other crafts are all allowed, it made creating super fun!

happy day shaker

It only made sense to create a happy celebration card to go along with this holiday! (I wish it was an official holiday! Wouldn’t that be cool!) I used some balloon dies by MFT and my Gansai Tambi water colours to create the balloons on Bristol smooth paper. I added some foil by using a brush (an old one) and some glue that dries tacky. The kind you can use to make your own glue dots. Ooh, note to self: adding this glue in dots would have made for pretty foiling too! I am usually foiled by whatever foiling technique I use. But I love it so I was determined to get it to work. I’m quite happy with the perfectly imperfect way this turned out, exactly as I had pictured in my mind before starting. The frame was created with some fun Happy Day dies by Concord & 9th. It’s easier to show you than to describe them.

happy_day dies

So, see how there is an outer frame then an inner one with a section missing? It allows you die cut a second time adding in either the flower die OR the happy die! Cool right? It’s partial die cutting ON PURPOSE! What??? :) In addition they have another set with a similar love add on and it includes a smaller frame, the word fits in a landscape position. If you are wondering how versatile dies like this are, you have to watch their excellent videos. Another C&9th set includes the word ‘Day’ which I die cut from some Tim Holtz glitter paper. I added the word to the bottom left, tossed in some sequins (Lucy’s Cards) along with some Martha Steward micro beads and dotted on some silver glitter Nuvo drops. Ta da! All done!

So back to the Tim Holtz glitter paper. It doesn’t shed at all, not even a bit. Which is awesome. But I smile every time I see glitter on my cheek so that’s not as big a deal for me as it is for some people. It is very thin so you’d think it would be easy to die cut. Nope! Unless you back it with cardstock, which kind of negates it being thin and self-adhesive, it refuses to cut cleanly. If you look at the bottom of the paper in your die you will think it’s cut cleanly. But that’s just the backing paper. It would work well with steel rule dies I’m sure but I have very few of those. My final thoughts; I will use it up but likely not buy any more.

Enjoy! Rebecca

September 30, 2017

Happy Day Cake Card and Gift Card Holder

This week is my last time hosting this month at Crazy 4 Challenges. I’ve loved cakes and this colour combo for a long time. Gold, coral and mint are so pretty together. So my challenge for the design team and all of you was to use the photo below as inspiration.

c4c happy day cake and gift card holder

So I finally got this stamp a few weeks ago and I love colouring it! This time I used watercolour which worked out really well. It’s especially easy to watercolour when you heat emboss first. In case you are wondering about the colouring on the cake, because this cake has visible icing between the layers, to me it looks like a naked cake. These usually have icing over the cake but so little you can see through it. So I started with a light tan ‘baked’ colour. Then I used a fan brush to add some streaks of ‘icing’ over the top. The icing is usually white but I decided to use mint.

For the envelope, I used some new dies by Concord & 9th. Instead of 1 huge envelope die they provide a top and bottom outline only. This allows you to adjust the height of the envelope if you wish. They also included many extra dies since so little metal is used for the envelope dies themselves. On the envelope flap, I die cut the words, Happy Day. Behind them I placed some Tim Holtz gold glitter paper. for finishing touches, I added some lace, pompom trim, sequins, gold paint splatters and a silk ribbon bow for the gift card holder.

Enjoy, Rebecca

September 24, 2017

Let’s Make an Interactive Card!

This was my challenge on Crazy 4 Challenges this week! I love making them so I’m thrilled there are so many dies and stamps coming out to make creating them easier!

c4c interactive slider dogs

So for my card this week. I channeled my inner Sandy Allnock. She creates the most awesome backgrounds for the stamped images she colours. It was actually pretty fun to add ink to the entire image. The park bench took me a while to draw, I had to remember all the lessons I’ve read about perspective and vanishing point! It would have been much easier to create a background if the two dogs could kiss without one being up higher than the other. Because her face is tilted up, she needed to be lower than him so he needed to be up on something. I thought of a rock first but that was too boring.

c4c interactive slider dogs2

Don’tcha just love his blushing cheeks! I created the slider with out using dies. I just drew two lines with pencil, added a curved line at each end by using a small circle die then cut it all out with a craft knife. A die would be much easier but it worked out just fine. The dogs and sentiment are by Avery Elle from the More Furry Friends set.

Come on over and join us this week at Crazy 4 Challenges. If the linky isn’t working, just add you link to the comments.

Enjoy, Rebecca

September 21, 2017

Fall Coffee Lovers Bloghop!

2017-fall-hop

Hi! Welcome to my small part of this awesome blog hop!

fall coffee smile card

I’ll be honest, I don’t really like the fall. Well, it’s ok but it means the cold weather is approaching. I’m pretty much allergic to the cold. Not literally but I do have a health condition which means I can’t be out in the cold. But, I do enjoy making fun fall cards! So here is my early fall card. I know daisies aren’t out much anymore but they reminded me of mums which are all over in the fall.

The banner was stamped with Weathered White Antiquities embossing powder by Ranger using a stamp from the Bunting Stamp by Avery Elle. I needed 4 layers to get it opaque enough but I like the textured look it gives. It didn’t stand out quite well enough so I used a Copic marker around the edge to darken it slightly and provide more contrast.

The cup is from the Perfect Blend stamp set by Neat & Tangled. It’s a slightly funky set I really enjoy. The Smile sentiment is from Honey Bee stamps. It includes the one large smile sentiment and lots of smaller add on words and phrases.

Enjoy, Rebecca

September 16, 2017

Shabby Hugs Card

ETA: My post got eaten up by Blogger. Sorry!

This week I asked the team at Crazy 4 Challenges to work with a sketch I designed.

c4c party hat hug

Here’s the card I made to go with it! This time I went with an eclectic collage style. I find it so fun to grab random supplies and make them work together.

C4C403Sketch

I hope you get a chance to play along with my challenge! Make sure to link up your creations to our blog!

Enjoy, Rebecca

September 09, 2017

A Glittered Hello

It’s my second week hosting over at the Crazy 4 Challenge blog! This week I chose glitter as my challenge! You get bonus points for using more than one kind/colour or use it in more than one way!

c4c hello gold glitter shaker

I was inspired to make a shaker card using two Project Life cards and some little embellishments that came with the kit. The shaker was sewn shut with acetate on top using my sewing machine. I sewed it about 2/3 of the way shut then added the little chipboard pieces, sequins and glitter then finished sewing it closed. The chunky glitter unfortunately blocks the view of the goodies inside but I found with another shaker I made that the static dies down after a while. I’ve no idea why but that shaker looked amazing after the glitter settled. Even IRL it looks better than it does here.

c4c hello gold glitter shaker2

I also used glitter in another, more subtle way. If you look closely at the aqua heart, it has a glitter star inside it. I added some bits of doily under the smaller PL card and a tulle puffy bow over the whole card. At the very bottom is a stamp from a new set I bought recently. Heffy Doodle is a new company who recently sold their first stamps via Kickstarter! What a great idea! The little stamp seen below is just one of dozens of small stamps meant to accompany all the awesome shaker cards we’ve all been making lately! So smart. I have a set like this but it is tiny and not nearly as cute! I highly recommend you check them out.

c4c hello gold glitter shaker3

I hope you’ll pop over and play along with my challenge. If you hate glitter, use glitter embossing powder, a glittered embellishment or glitter paper. Jennifer McGuire had a great post earlier this week with some ideas to corral glitter. My own card was shedding quite a bit from between the stitches so I sealed the edges with some glossy accents. Just a tiny bead where the acetate met the paper. Ta Da! All better!

Enjoy, Rebecca

September 02, 2017

No!!! Summer Can’t Be Over!

I can’t believe how cool it’s gotten here in Southern Ontario! It’s usually super hot on Labour Day weekend yet we have the heat on! I love, love, love summer and once again, it’s flown by! But I couldn’t let go just yet. It’s my turn to host for the month at Crazy 4 Challenges so I chose a summer or beach theme for this week. Just make any summer or beach-themed project; it can be a card or something else! c4c beach retirement

I used some older paper from Bo Bunny this week with a sentiment that is part SSS and part PTI. The flower is a die cut from the same collection but I altered it by making the white edge smaller, adding Glossy Accents and a touch of glitter. The papers were all sponged to help them stand out more from each other. This collection includes some awesome papers but not a single one is subtle! They are all large scale, full-page designs or very bold. I added a touch of stamping to the card base with stamps from Taylored Expressions and a few sequins.

I really hope you’ll head on over to the C4C blog this week. My guest this month is the amazing Teresa Kline so go check out her sweet card!

Enjoy, Rebecca

August 31, 2017

Cards for 2017 Papertrey Ink’s Stamp-a-Faire

Before starting this, make sure you’ve gone to the washroom and grabbed a beverage, it’s pretty long!

For anyone who wasn’t aware of the massive stamping event this past weekend, Papertrey Ink had a huge video tutorial/event/challenge/prize giveaway for anyone who wanted to join and best of all, it’s all online! Each year has a theme; this time it was traditional anniversary gifts for the first 10 years of marriage.You might notice I published this with mere minutes to spare to link these cards up.

Well, I tried! I fought the clock and the clock won! I got carried away making cards this morning until I had no time left for leaving comments (which I should have done days ago) and I only got to link up 4 of these! I’m honestly pretty bummed because I worked really hard on them. But this year the event was so huge, too huge really! There were 21 challenges compared to 11 normally and honestly, I was overwhelmed. I did create during all three days including almost all day on Sunday but I work pretty slowly. And, ya know, I’ve still got kids, a hubby and a life to live. Eating and sleeping are pretty much requirements no matter how much I want to stamp.

So here are all the cards/projects for the challenges I completed. Please forgive the hasty photography. I didn’t have time to get creative. Starting from the top:

Warm up: Choose a colour palette from the inspiration photos out of the ones provided to make a quick card.

saf 17 warm up

I’m not normally into all things super CAS, graphic or black and white. But something about this just spoke to me this day. All products are PTI.

Year 1: Gift-Paper

saf 17 paper

The challenge was to use paper to make some embellishments for gift packaging. The papers, button and leaf die are PTI.

saf 17 scrapsThe next challenge (there were two per year) was to use up some scraps. I didn’t use scraps for the cover plate die cutting but I did use up a ton of tiny vellum bits. Everything on here is PTI except the gold thread.

Year 2: Gift-Cotton

saf 17 cotton candy

This tutorial made me intensely happy! OMW! Isn’t this the cutest thing ever? Well except for newborn babies, oh and newborn animals, ok and maybe little tiny girls in ruffled bottom swimsuits (we were at the water park yesterday). Fine, maybe not the cutest thing ever but definitely one of the cutest card embellies I’ve ever seen! It’s made with dyed cotton balls! My glitter stripes were enhanced with some heart confetti before I added the glitter. It just ups the cute factor right? The cardstock, die, ink and ribbon (not the pompom trim) are all PTI.

saf cotton flower

Another cotton challenge using crinoline. I had some from way back and honestly, I don’t know why I haven’t made more of these flowers lately! When I bought the crinoline, I also bought some satin and organza to make other flowers. This time I combined them for this shabby chic lovely! I’ve also added some tulle in there. The polyester layers were heated to make the edges curl which gives them more volume and also makes them look more shabby. The PTI products on this are the cardstock, ribbon, sentiment, ink and the border die.

Year 3: Gift-Leather

saf 17 leather look

This was a fun technique to do. I’ve done it before but not for a very long time. You scrunch up and ink your paper after wetting it to make it look like leather. They used some glycerin in the water but just water works fine too. Everything is PTI except the sentiment and brads. I didn’t get to the second leather challenge.

Year 4: Gift-Linen
saf 17 wrap

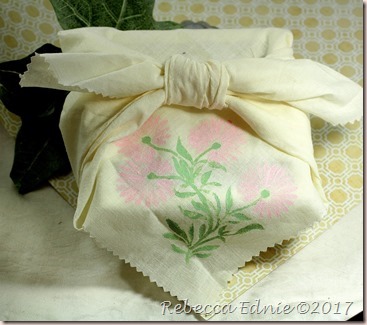
I struggled to find fabric for this challenge, to stamp on fabric to make a Japanese inspired gift wrap, in a very messy basement! Then I walked through a spider’s web getting to my fabric boxes, ehh! So I found this piece only to get it upstairs and find it was a piece my mom gave me with adhesive from embroidering or using adhesive interfacing? all over the back. I’m sure many moons ago when she gave it to me I was told to wash it, or only use it for card fronts or something. Anyway, the back is yucky but I figured I’d try out stamping on it with paints. The first time was too light because I used too little paint. Next time the details were obliterated by too much. The next time was just right, like when Goldilocks found poor baby bear’s stuff! I learned to add the paint very quickly, then remove excess from the grooves with a small paint brush then stamp. Stamps are PTI.saf 17 linen embroidery
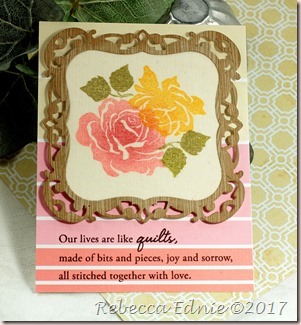
The next video taught us to stamp on fabric for an embroidery-style look. I think it might be fun in the future to stamp an image really lightly then embroider over it! Everything is PTI except the frame die.

Year 5 was wood and I loved the challenges, I just didn’t get to them. Bless you if you’ve made it this far, go grab another cuppa, there’s still a lot to go.

Year 6: Gift-Iron

saf 17 rusted iron

This was one of the most unique in my opinion. I’ve always loved the look of aged metal with a patina. Especially green copper! So I was super excited for this challenge. you’ll have to go to the blog to read about all the steps. I started with PTI inks but my ridges were too high so I switched to Copic markers applied by airbrushing tohem. The background paper, some of the ink and sentiment are PTI. I didn’t get to the other iron challenge. I just didn’t like the look so I skipped it.

Year 7: Gift-Wool
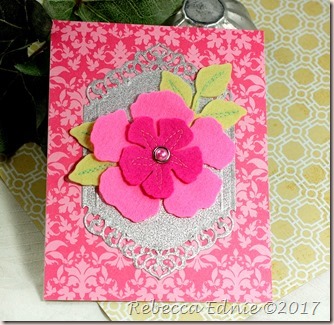
saf 17felt flower

We were asked to make a stitched wool felt embellishment. I used PTI felt and background paper to make this flower.

saf 17 cookies

In another totally adorable tutorial, we were shown how to make some felt cookies! My 5 yo son just got a play kitchen from IKEA so he was thrilled to have some cookies to add to his collection of play food. I used PTI felt to make them. The stitch Debbie taught us was so cool! I’d never seen that one before in any book or online. Totally awesome!

Year 8: Gift-Bronze

saf 17 bronze perfect pearls

I love shiny, pretty stuff so these videos were perfect! I don’t use my Perfect Pearls often enough so the first challenge got my ideas flowing. In the end, even though I loved the teal and bronze combo, I struggled to find another colour I liked with them, with this style of die. A turquoise or aqua paper didn’t look elegant enough. A pink or red was too jarring. A neutral too boring. A yellow, orange or blue, too primary. So I stuck with monochromatic. The word die is inset which looks pretty classy, if I don’t say so myself! The cardstock and word die are by PTI.
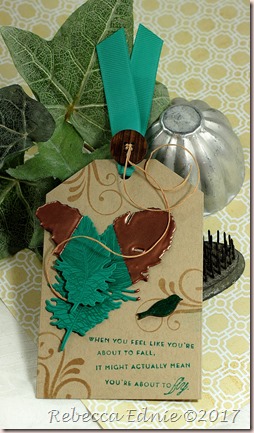
saf 17 bronze embossed

This tag was really fun to make. I remain one of those people who think heat embossing is super cool even though I’ve been stamping on and off for 30+ years. It’s even cooler when you add a ton of layers to get a solid metal appearance. These feathers look like they’ve been dipped in liquid metal right? The sentiment I wanted to use was way too long for the space. I didn’t want to cut it up so I selectively inked each section. But it would be tricky to get it all perfect and lined up that way. So I left it messy on purpose! I really like how it looks! Cardstock. stamps, ink and feather dies by PTI.

Year 9: Gift-Pottery
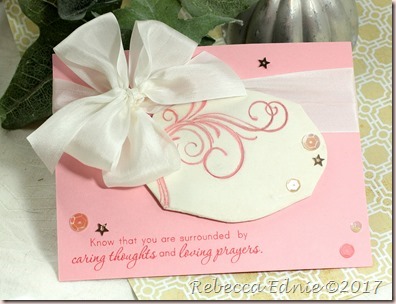
saf 17 pottery

Ok, so if you’ve never used air dry clay, it’s like the coolest thing ever!OK, maybe not as cool as heat embossing, or walking on the moon or… Fine, but it’s pretty cool! The video showed how to roll it flat then ink up a stamp pressing it into the clay to get a coloured impression. Pretty neat right? Then all you have to do is STAY AWAY. Do not fuss the clay! I’m always trying to move it and touch it, check on it and dry it faster by turning it over. Just leave it alone (or so I try to tell myself repeatedly!) The cardstock, stamps and ink are by PTI. The other challenge was to make an easier version of salt dough which I was going to make with the kids but I ran out of time for that one too.

Year 10: Gift-Aluminum and Tin

saf 17 gilding flakes

I think this one turned out super fabulously! The ‘tin’ item on here was supposed to be silver gilding flakes but I chose gold instead. This was my first time using them so it look me a couple of tries to get it right. I started with Heat n Stick with a stamp that was too fine. Then I tried stamping the same sentiment with regular ink but outlining it with a glue pen. ooh, also no good, too hard to control! But this time worked out for me, mostly, it’s far from perfect! But I really like it. I used a more solid, defined stamp and used heat n stick powder. For the line I used Be Creative Tape. The flowers have gilded centers adhered with the glue pen. But it doesn’t stick well to the embossing so next time I plan to use gilding, I will brush off the embossing powder from the areas I plan to gild before setting the powder. The flowers were simply watercoloured by dropping the pink into each area which was already wet.

If you got this far, you deserve a medal! Brava! I posted many of these cards to Instagram on the weekend. I’m going to try to post there more often, right from my craft desk. I’d love to see you over there! You can find me at this link. Rebecca Ednie’s Instagram.

Enjoy, Rebecca

August 23, 2017

Mr & Mrs Shaker Card

If I had enough time and sequins, I would make all my cards shaker cards!

SCS 01 mr and mrs wm

This card uses dies from Papertrey for the bride and groom. The frame was created with good old Labels 1 Nestabilities by Spellbinders. I altered a lot of cardstock for this card. The black cardstock was already black but I wanted some shimmer so I added some Delicata ink. The gold frame and die cut sentiment were painted with gold leafing paint. Along with the sequins, this ends up being a pretty shiny, blingy card!

The patterned papers are by My Mind’s Eye and I think I could use 5 pads! It’s one of my favourite paper pads ever! I love foiled papers. So here’s a tip when you are making shaker cards: if you plan to put any sentiments or embellies over the shaker, block those areas off with foam tape. That way you don’t waste excess sequins filling the shaker especially since you won’t even see them most of the time!

Enjoy, Rebecca

August 21, 2017

Pastel Hugs

Working with a sketch always makes me happy. I watched a video by Yana Smakula about using an embossing folder as a stamp. So I tried it combining the technique with our sketch challenge this week at Crazy 4 Challenges.

c4c pastel hugs

I used similar soft ink colours from Altenew with a folder from Spellbinders. The first try I got a gorgeous background but it was too bright for what I was trying to achieve. In the end I used only the lightest of the inks from 3 collections, blush, pink diamond and buttercream. To do this technique, you spread the inks randomly over the more solid surfaced side of the folder. Spritz the inks with water until they pool up. It might require more water than you’d think. Then add Bristol or watercolour paper and close the folder. To get a good impression, press well or use a brayer to add moderate pressure. The goal is to get a good impression with the ink but not with the ridges of the folder.

I wanted something light and fluffy at the top when I remembered about a fringe die I bought but hadn’t used. I didn’t have the right colours so I used white and very, very delicately inked it with matching colours. Then I added some lace and sewed it on with gold thread. For the three elements on the sketch, I tried a ton of embellies and flowers. In the send, I chose two layered flowers by Maggie Holmes and two Prima pearl clusters. A die cut and layered Hugs die cut with the same colours, just a bit darker, inked on it and a few sequins finished it off.

Join us for this fun sketch this week! It’s open until Friday at midnight when we post our next challenge.

Enjoy, Rebecca

August 15, 2017

Monochromatic Coffee Drinks

Our challenge this week was to make a monochromatic card; you can still use black and white/ivory. I got the new Perfect Blend stamps and dies from Neat & Tangled stamps during their recent sale. This was a perfect time to use them!c4c monochromatic I love getting Frappuccinos at Starbucks. I’m not into coffee but I sure love those! There was a sale on them, half price for a week, I am ashamed to say I had one almost every day!

This card uses some old My Mind’s Eye paper for the base and other layers. The drinks were stamped on X-Press it paper and blended with Copic markers. The straws are a separate piece, I inserted them into the cup die cut by using a craft knife to cut where a real drink lid would be cut and tucked them in. The drink mix inside the cups was coloured with R 81, 83, and 85 markers in a swirly pattern. I was trying to mimic those drinks where they add syrup to the cup first then blend the drink making pretty swirls. I saw Sandy Allnock do this once and it looked fantastic. The layers were cut with Label 55 dies from Spellbinders and the banner was hand cut except for the banner end which was done with Fishtail Banners from Sunny Studio. Believe it or not, I got that pretty lace at the dollar store! It’s a really nice cotton lace.

Monochromatic cards are so fun and easy because so many of the decisions are already made! Hope you can come and join us this week!

Enjoy, Rebecca